Activating Office Web Apps on SharePoint 2010
After installing Office Web Apps I tried to activate the Site Collection Feature, which gave the descriptive error: File not found. Thankfully Tonys did know what to do with this problem as described here.
The event viewer returns errors about the Alternate Access Mappings that hasn't been configured yet and that users are accessing the site through unregistered URLs. To fix this add the URL that is indicated, and the activation of the Office Web Apps Site Collection Feature will go through smoothly.
Hope this helps someone!
Set native resolution during LTI deployment
When you install Windows 7 the old fashioned way, the resolution of the desktop is automatically set to the native resolution of the screen. However during my LTI deployment I noticed that it was still set to 1024 x 768 which annoyed me to no end. After a quick look in the default MDT unattend.xml I found the solution.
If a resolution is set in the unattend.xml (<deploymentshare>\Control\100), Windows will force itself to use that resolution. If nothing is set in the unattend.xml Windows will set the native resolution of the screen. Therefore the solution is to remove the display sections in the unattend.xml. These lines should be removed:
<Display><ColorDepth>16</ColorDepth>
<HorizontalResolution>1024</HorizontalResolution>
<RefreshRate>60</RefreshRate>
<VerticalResolution>7
Application install errors during LTI deployment
I added a couple of applications to my newly setup LTI deployment that didn't install properly. After a search in the log files I found an entry in the ZTIApplications.log (C:\Windows\Temp\DeploymentLogs) that shed some light on the problem. Some of the applications encountered error 1632. Google soon provided me with the description of the error (link)
1632
ERROR_INSTALL_TEMP_UNWRITABLE
The Temp folder is either full or inaccessible. Verify that the Temp folder exists and that you can write to it.
As indicated the temp folder was somehow locked out. This was due to a software deployment GPO that triggered after the reboot. The software couldn't be installed which locked the temp folder. After disabling the faulty GPO the applications were deployed properly.
PXE-E55: ProxyDHCP service did not reply to request on port 4011
The error message can differ a bit as it is network card controlled. Unfortunately there is no single fix for this issue. There are a lot of causes for this issue. I will list solutions down here as I run into them.
Solution 1:
All approved and rejected devices are added to a database. If a device is rejected WDS will not respond to requests coming from this device. The best way to solve this is to clear the rejected and/or approved devices database. To do this log on to your WDS server and run the following command:
Wdsutil.exe /delete-autoadddevices /devicetype:rejecteddevices
Wdsutil.exe /delete-autoadddevices /devicetype:approveddevices
LiteTouch has encountered an Environment Error (Boot into WinPE!)
After I disabled a couple of steps in the task sequence, I was confronted with this error that had me puzzled for a while. However it was not related to my changes. The deployment before the changes ended in errors and the clean-up didn't finish all the way afterwards. When you start a new deployment it checks if a deployment is already in process on that computer. The harddrive had a partition with the folders minint and _SMSTaskSequence on it.
There are two ways to fix this issue:
Option 1:
- Start into PXE and when the error is presented press F8
- In the console type: diskpart
- Type: select disk 0
- Type: clean
Option 2:
- Start into PXE and when the error is presented press F8
- In the console type: c:
- Type: format c: /Q
Office 2010 deployment with language packs
Deploying desktops can take quite some time, however using Windows Deployment Services in combination with Microsoft Deployment Toolkit 2010 update 1 automates it all. In this article I will get down and dirty with deploying Office 2010 Pro Plus with language packs using MDT.
Start with copying the DVD/ISO to a separate folder. I choose to use the English version as the base, but you can use any language you want.
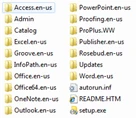
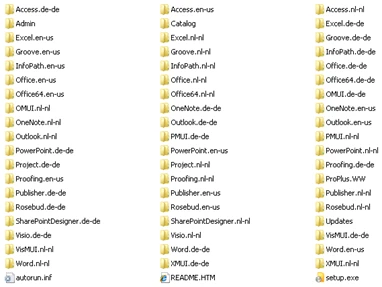
Copy the contents of the Office Language Pack 2010 <language> to the same folder. You will be presented with a couple of duplicate files and folders. You can accept the folders, but don't overwrite the current version of the files. You will end up with something like this.
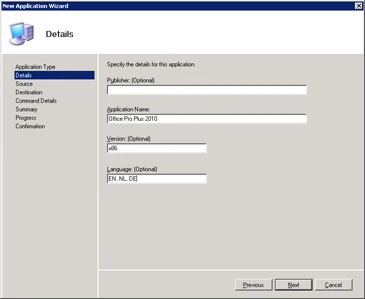
Step 2 is to import the whole Office 2010 application into Deployment Workbench.
- Right click Applications in your deployment share and select New Application
- Select the option Application with source files
- Enter the Application Name, Version and Language
- Select the directory where you combined the installation source and the language packs
- Specify the name of the directory that should be created
- Enter setup.exe in the command line box
- Files are being copied to the Deployment Share
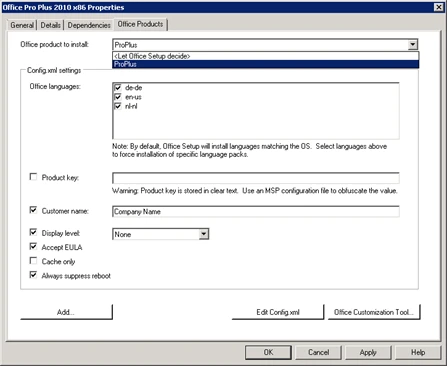
Step three is to edit the application settings and create an Office customization file with the Office Customization Tool.
- Right click the Office Pro Plus 2010 x86 application and select Properties
- Click the Office Products tab
- Select ProPlus in Office product to install
- Check the languages you want to include in the install
- Fill out the Customer name field
- Select None in the Display level dropdown box
- Check Accept EULA
You can leave the Product key field empty because I'm using the KMS key. The MSP that we will create with the Office Customization Tool will include this. If you're using the MAK key you may insert it here, however do note that the product key is stored in clear text as indicated in the warning. I advise you to enter the MAK key in the Office Customization Tool where it will be obfuscated.
Click the Edit Config.xml button to confirm that the following lines are present in the generated file.
<AddLanguage Id="match" /><AddLanguage Id="en-us" ShellTransform="Yes" />
<AddLanguage Id="de-de" />
<AddLanguage Id="nl-nl" />
The Id attribute in those XML lines is the language that will be added to the installation. Make sure that the right language has the attribute ShellTransform set to Yes.
Now click the Office Customization Tool button. You will be presented with a dialog that tells you to save the MSP file in the location <deployment share>\Applications\Office Pro Plus 2010 x86\Updates when you're done. If you don't save the file in that location the MSP will not be used during the installation.
- Select the Microsoft Office Professional Plus 2010 (32-bit) product
- In the Default File Types dialog I recommend to select the Office Open XML formats option as this is most used and supports all the formatting options in the Office applications
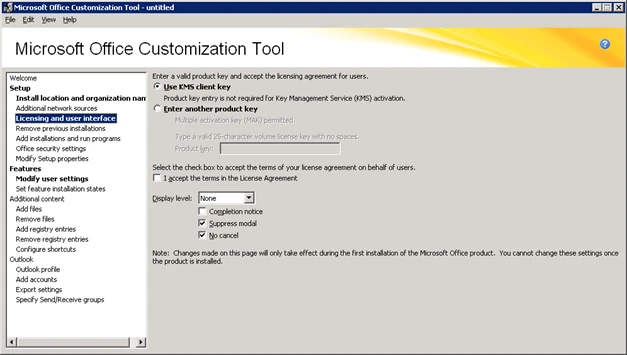
- Select Licensing and user interface
- Check the I accept the terms in.. option
- Select Display level None and check No cancel if you want to remove the cancel button during installation
- Edit all other options that you want changed like: Organization name
- Click File > Save As and store the file in the previously mentioned location
Office Pro Plus 2010 is now available in the Task Sequence. Don't forget to add it to your task sequence.
Removing offline files sync partnership
Removing a offline files sync partnership is not as straight forward as it should be. However there seems to be a way to remove them none the less.
-
Disable offline files in the Sync Center
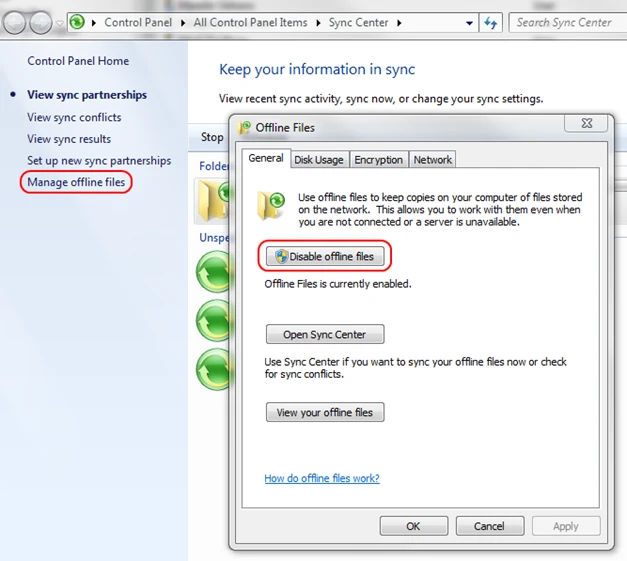
- Reboot
-
Go to C:\Windows\CSC\v2.0.6\ and take ownership of the folder
- right click the CSC folder, chick properties.
- click security
- advanced
- owner
- edit
- select or add your username to the list
- put a check mark in "Replace owner on ..."
- OK
- Delete the server folder that you want to remove from the partnership
- Reboot
-
Restore permissions on the C:\Windows\CSC\v2.0.6\ folder
- Go to the permission tab and make sure the checkbox -include "inheritable permissions from this object's parent"-
is checked. Then reboot and verify the permissions are correct.
- Go to the permission tab and make sure the checkbox -include "inheritable permissions from this object's parent"-
Offline files should now work again and the sync partnership should now be removed completely.
Source: http://social.answers.microsoft.com/Forums/en-US/w7programs/thread/13133688-7a7c-410a-a978-3d3d86f1c9b8
Creating a file of a certain size
Sometimes you just need a file that takes up space. To test transfer speeds, file size issues, etc. The way to do this is to use fsutil.
fsutil file createnew <name.ext> <size in bytes>
You now have a file that is exactly the size that you need it to be.
RESTORE cannot operate on database because it is configured for database mirroring
If you're trying to remove database mirroring from a DB, the mirror server will keep the DB in recovery mode. To take it out of recovery mode you'll have to run the following query:
ALTER DATABASE <Database> SET PARTNER OFF
The transaction log for database ‘VIM_VCDB’ is full
Today my VMWare vCenter crashed. The event viewer showed me the cause of the problem. The VIM_VCDB database used for performance logs amongst others has a growth restriction set to 500MB. If you add a lot of VMs or if you increase the log level, you might run into this error.
Symptoms
- Can't connect to vCenter with vSphere client
- VMWare Virtual Center Server service is not started
- Event viewer shows critical events with ID 9002 and ID 1000 (below)
Event Type: ErrorEvent Source: VMware VirtualCenter Server
Event Category: None
Event ID: 1000
Date: 12/22/2010
Time: 1:06:02 AM
User: N/A
Computer: <server>
Description:
The description for Event ID ( 1000 ) in Source ( VMware VirtualCenter Server ) cannot be found. The local computer may not have the necessary registry information or message DLL files to display messages from a remote computer. You may be able to use the /AUXSOURCE= flag to retrieve this description; see Help and Support for details. The following information is part of the event: An unrecoverable problem has occurred, stopping the VMware VirtualCenter service. Error: Error[VdbODBCError] (-1) "ODBC error: (42000) - [Microsoft][SQL Native Client][SQL Server]The transaction log for database 'VIM_VCDB' is full. To find out why space in the log cannot be reused, see the log_reuse_wait_desc column in sys.databases" is returned when executing SQL statement "UPDATE VPX_HOST WITH (ROWLOCK) SET DATACENTER_ID = ? , DNS_NAME = ? , HOST_KEY = ? , IP_ADDRESS = ? , EXPECTED_SSL_THUMBPRINT = ? , HOST_SSL_THUMBPRINT = ? , USER_NAME = ? , PASSWORD = ? , PASSWORD_LAST_UPD_DT = ? , SOAP_PORT = ? , AUTHD_PORT = ? , ENABLED = ? , VPXA_ID = ? , MASTER_GEN = ? , MASTER_SPEC_GEN = ? , VMOTION_ENABLED = ? , FAULTTOLERANCE_ENABLED_FLG = ? , LICENSED_EDITION = ? , LOCAL_IP_ADDRESS = ? , ADMIN_DISABLED_FLG = ? , MANAGEMENT_IP = ? WHERE ID = ?".
Event Type: ErrorEvent Source: MSSQL$SQLEXP_VIM
Event Category: (2)
Event ID: 9002
Date: 12/22/2010
Time: 1:06:02 AM
User: NT AUTHORITY\SYSTEM
Computer: <server>
Description:
The transaction log for database 'VIM_VCDB' is full. To find out why space in the log cannot be reused, see the log_reuse_wait_desc column in sys.databases
Solution
Change the autogrowth settings in the SQL Management Studio. You might have to install the SQL Server Management Studio Express, but you can also use the full version if you have it installed.
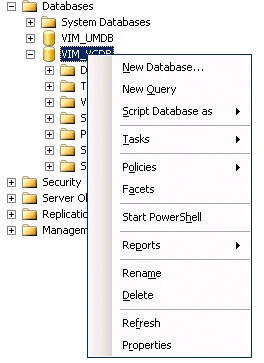
- Right click the VIM_VCDB database and select Properties
- Click Files in the left menu and click the Autogrowth edit button of the VIM_VCDB_log
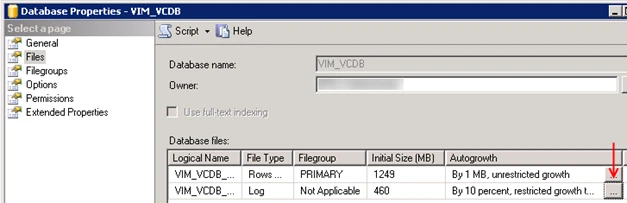
- Set the Maximum File Size to an appropriate value, 2GB in my case
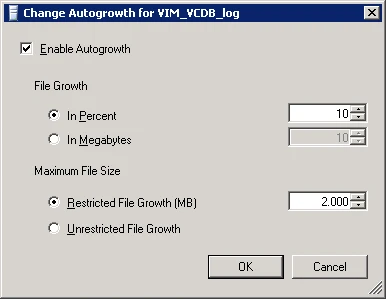
- Start the VMware VirtualCenter Server service on the vCenter Server
If you run into the problem again you can repeat the steps and increase the Restricted File Growth even more